
Signal-SeekerTM kits are ideal tools to perform PTM enrichment, which is essential for many methods of PTM detection including western blot and mass spectrometry.
The following protocols are derived from the kit manuals, and utilizes western blot analysis mehods.
Links to product pages are provided for specific product information:
Click here Signal-Seeker Phosphotyrosine Detection Kit.
Click here Signal-Seeker Ubquitination Detection Kit.
Click here Signal-Seeker SUMOylation 2/3 Detection Kit.
To see data generated using Signal-Seeker kits:
Click here Signal-Seeker Validation Data.
Reagents
Contents supplied with signal seeker kits (shown is an example for BK161). See Phosphotyrosine (Cat. # BK160), Ubiquitination (Cat. # BK161), and/or SUMOylation (Cat. # BK162) kits for specific reagents for each kit.
| Lysis and protein quantitation step | IP and pre-clear step | Wash step | Elution step | Western step |
|---|---|---|---|---|
| BlastR™ Lysis Buffer | Ubiquitination Affinity Beads | BlastR™ Wash Buffer | Spin Columns | Chemiluminescent Reagent A |
| BlastR™ Dilution Buffer | Ubiquitination Control Beads | Bead Elution Buffer | Chemiluminescent Reagent B | |
| BlastR™ Filters | Anti-ubiquitin-HRP antibody | |||
| Protease Inhibitor Cocktail | ||||
| De-Ubiquitinase inhibitor Cocktail | ||||
| Precision Red™ Protein Assay Reagent |
Note: Standard reagents and equipment required but not supplied:
It is recommended to aim for 1.0 mg of total protein lysate per IP assay as an optimal starting point. We recommend utilizating150 cm2 plates.
Protein yield varies widely for any given cell line, and it is strongly recommended to perform a “test plate” protein quantitation, particularly if you are unsure of the expected protein yield from your experimental conditions (see appendix V).
Processing Tissue Culture Cell Lysate:
1. Grow and treat tissue culture cells as required.
2. Prepare BlastR™ lysis and dilution buffers with inhibitors (see appendix VI).
3. Remove culture media and wash the cells twice with 10 ml of 1x PBS.
Note: remove as much PBS as possible prior to adding BlastR™ lysis buffer in order to maximize cell lysis.
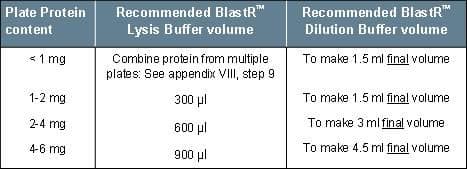
4. Add X µl of BlastR™ lysis buffer (based on expected protein yield; see table 2) and lyse cells using a cell scraper. The lysate will become viscous due to nuclear lysis.
Table 2: BlastR™ Lysis/Dilution Buffer Chart
5. Use a snipped 1 ml pipette to transfer the crude lysate into a BlastR™ filter that has been placed in a 15 ml collection tube (see Appendix VII).
6. Use a supplied filter plunger to completely compress the BlastR™ filter and collect the lysate flow through, including any bubbles , in a 15 ml tube (see Appendix VII).
7. Optional: Centrifuge the lysate at approximately 10,000 g for 1 minute at 4°C. Transfer to a new tube.
8. Dilute the lysate with BlastR™ Dilution Buffer to give the final volume given in Table 2. This step is important as the final buffer composition will affect the IP reaction stringency.
9. Quantitate protein concentration (see appendix VIII).
10. Based on protein concentration, dilute sample with a buffer mix (1 part BlastR™ lysis: 4 parts BlastR™ dilution) to a desired final concentration (usually 1 mg/ml).
11. Snap freeze aliquots of any samples that won’t immediately be used. Proceed to STEP 2.
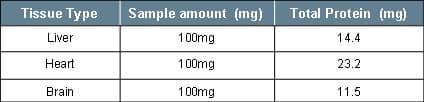
It is recommended to aim for 1.0 mg of total protein lysate per IP assay as an optimal starting point. Table 3 provides examples of protein yield from 100 mg of various tissue types.
Table 3: Example Protein obtained from 100 mg of Tissue
Processing Tissue Lysate:
1. Obtain fresh or frozen tissue.
2. Prepare BlastR lysis and dilution buffers with inhibitors (see appendix VI).
3. Add 1 ml of BlastR™ lysis buffer per 100 mg of tissue in a glass dounce tissue grinder/homogenizer, and apply 10-12 strokes. The lysate will become viscous due to nuclear lysis.
Note: The amount of BlastR™ lysis buffer will change depending on the amount of tissue used. For example, if you use 50 mg of tissue then lyse with 500 µl of BlastR™ lysis buffer.
5. Use a snipped 1 ml pipette to transfer the crude lysate into a BlastR™ filter that has been placed in a 15 ml collection tube (see Appendix VII).
6. Use a supplied filter plunger to completely compress the BlastR™ filter and collect the lysate flow through, including any bubbles , in a 15 ml tube (see Appendix VII).
7. Add 200 µl of lysate to a 1.5 ml tube. Snap freeze the remaining lysate.
Note: Only a fraction of lysate is processed further as 100mg of tissue will produce excess lysate. However, this is tissue type dependent.
8. Dilute the 200 µl of filtered lysate with 200 µl of BlastR™ Dilution Buffer and mix.
9. Centrifuge the lysate at approximately 10,000 g for 10 minute at 4°C in a table-top microcentrifuge. Transfer supernatant to a new 15 ml tube.
10. Add 600 µl of BlastR™ Dilution Buffer to dilute the clarified lysate to a 1 ml final volume. This step is important as the final buffer composition will affect the IP reaction stringency.
11. Quantitate protein concentration (see appendix VIII).
12. Based on protein concentration, dilute sample with a buffer mix (1 part BlastR™ lysis: 4 parts BlastR™ dilution) to a desired final concentration (usually 1 mg/ml).
13. Snap freeze aliquots of any samples that won’t immediately be used. Proceed to STEP 2.
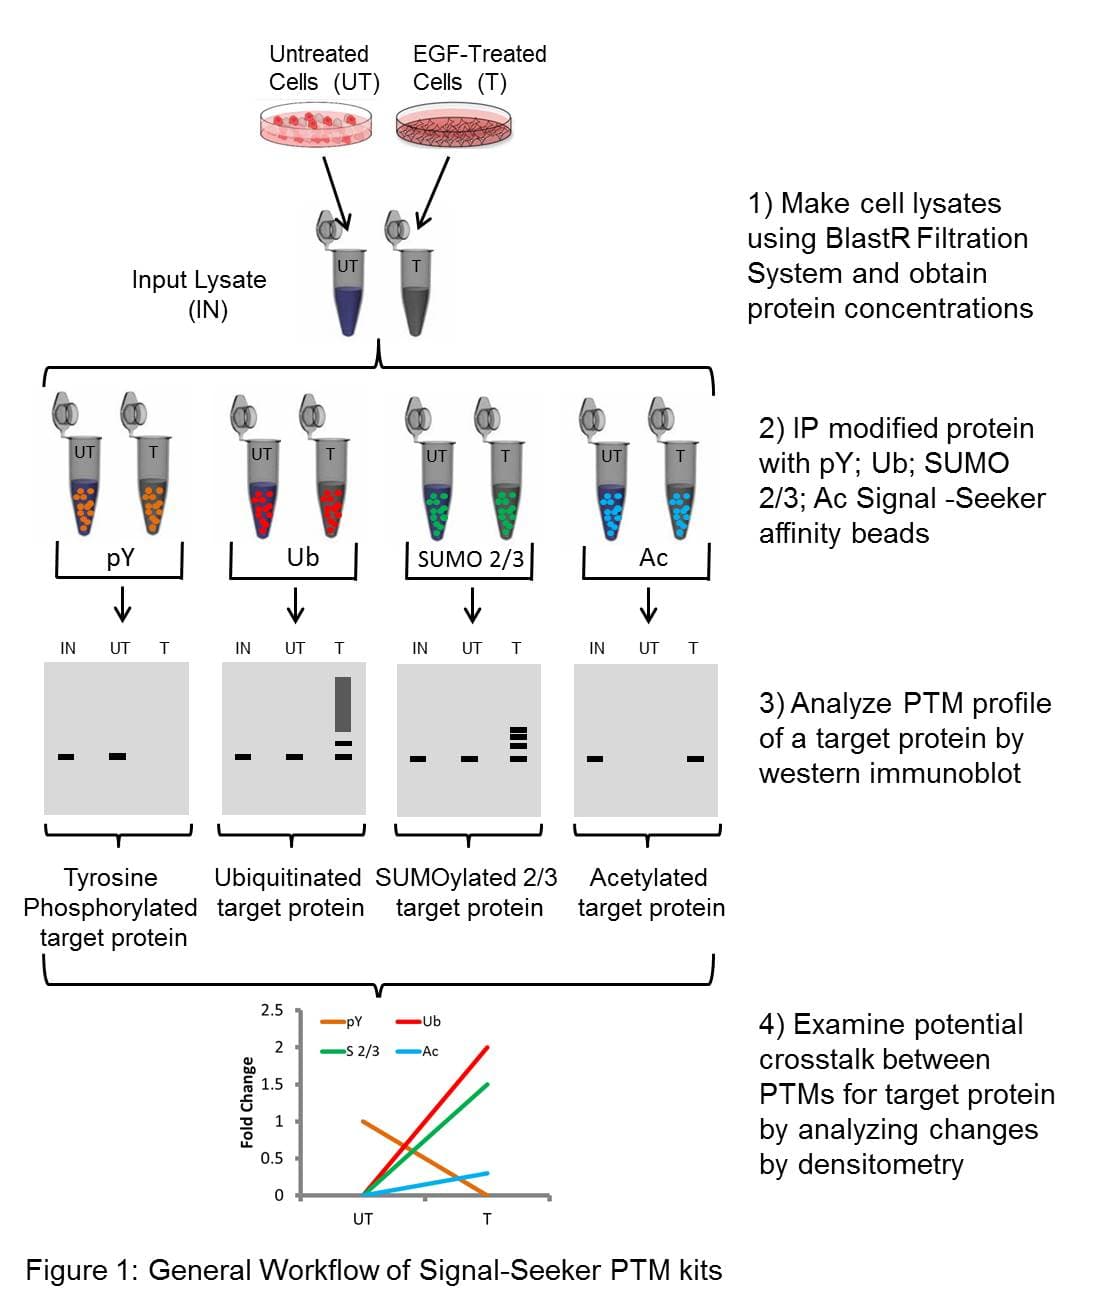
STEPS 2 & 3 described below are protocols for the ubiquitination kit (#BK161). See phosphotyrosine (BK#160) and SUMOylation 2/3 (BK#162) manual for specific instructions (e.g. affinity bead volume).
1. Invert tube containing Affinity Bead 1 suspension several times to make sure that the beads are completely resuspended in the tube.
2. For each IP assay, aliquot 20 µl of bead suspension into a tube on ice. (IP tube).
3. Invert tube containing IP Control Bead suspension several times to make sure that the beads are completely resuspended in the tube.
4. Aliquot 20 µl of bead suspension for a control reaction to determine non-specific binding of ubiquitinated species. (Control IP tube).
5. Wash beads 2 times with 250µl 1X PBS-T to remove storage buffer.
6. Add lysate to each IP tube and control IP tube. We recommend 1.0 mg of lysate per assay as a starting point. NOTE: the amount of lysate required will vary depending upon the abundance of modified target protein.
7. Save a small amount of lysate (20 µl) to run as a western input lysate control. Add 5 µl of 5x sample buffer and boil for 5min. Save for western analysis.
8. Incubate the tubes on a rotating platform at 4°C for 2h.
9. Collect beads by centrifugation at 3-5,000 x g for 1 minute at 4°C.
10. Aspirate off as much supernatant as possible without disturbing the beads.
11. Wash beads in 1 ml BlastR-2™ Wash Buffer (inhibitors are not necessary at this stage) for 5 minutes on a 4°C rotating platform.
12. Collect beads by centrifugation at 3-5,000 x g for 1 minute at 4°C.
13. Aspirate off as much supernatant as possible without disturbing the beads.
14. Repeat the wash step (10-12) two more times.
15. After the final wash, completely remove buffer supernatant without disturbing the bead pellet. Optional Technical Tip: remove residual supernatant using a fine bore protein loading tip.
16. Add 30 µl of Bead Elution Buffer and resuspend the beads by gently tapping/flicking the side of the tube. DO NOT use a pipette at this stage.
17. Incubate at room temperature for exactly 5 minutes.
18. Gently transfer each bead suspension to one of the spin columns provided in the kit. It is recommended to snip the end off the transfer pipette tip for gentler transfer.
19. Place the spin column in a fresh collection tube and centrifuge at 9-10,000 x g for 1 minute at room temperature to collect the IP sample.
20. Add 2 µl of 2-mercaptoethanol to each sample and mix well.
NOTE: It is convenient to snap the lid off the spin column and use this to cap the collection tube for further processing.
21. Place samples in a boiling water bath for 5 minutes. Collect sample by centrifugation at 10,000 x g for 1 minute at RT.
22. If necessary, freeze samples and stop here, or proceed to running SDS-PAGE and western blot analysis, see STEP 3A & 3B.
1. A primary antibody provided by the end user will be used for detection of the ubiquitinated version of the protein of interest. The SDS-PAGE and western blot should be performed according to your laboratory protocol.
2. While colorimetric and fluorescent detection methods may provide sensitive, linear western signals for the detection of your target protein, we highly recommend the use of the ultrasensitive chemiluminescence detection reagent that is supplied in this kit as it is generally 10 fold more sensitive than fluorescence detection and 20 fold more sensitive than colorimetric.
The chemiluminescent reagent should be used in conjunction with an HRP-labeled secondary antibody capable of detecting your primary antibody. For mouse monoclonal antibodies (MAbs) we would recommend using a 1:20,000 dilution of an HRP-conjugated goat anti-mouse (eg. goat anti-mouse HRP conjugated IgG from Jackson Labs., Cat. # 115-035-068).
3. The chemiluminescent detection reagents supplied in this kit is sufficient for 10 minigel sized westerns. A volume of 2 ml of chemiluminescent reagent per minigel sized transfer membrane (approx. 8 x 7 cm) should be used. The following method is recommended;
a) After incubation with appropriate secondary antibody (30 minutes room temperature is recommended), wash the blot 6 x 10 minutes in TBST (50 ml per wash per 8 x 7 cm membrane)
b) Immediately before use, mix 1 ml of chemiluminescent reagent A with 1 ml of chemiluminescent reagent B (sufficient for one 8 x 7 cm membrane).
c) Add chemiluminescent reagent to membrane and incubate with gentle rocking at room temperature for 5 minutes prior to visualization of protein signal using x-ray film or CCD camera imaging.
NOTE: shorter incubation time in the chemiluminescent reagent may be necessary for highly abundant proteins.
It is good practice to check the IPs for total ubiquitinated species. This serves as a control assay to make sure that the IP reactions are efficiently enriching for ubiquitinated proteins. Two methods for determining IP efficiency are given below.
Method 1: Re-probe Blot with anti-ubiquitin-HRP
1. After detection of the protein of interest, the blot can be re-probed with the anti-ubiquitin-HRP labeled antibody supplied in this kit. This allows a positive confirmation that ubiquitinated proteins have been selectively enriched using the ubiquitination affinity beads.
NOTE: Stripping the blot prior to probing is not necessary as the signal from total ubiquitinated species will be significantly stronger than that from your protein of interest.
2. After a brief 10 minute wash in TBST at room temperature with shaking, incubate the membrane with a 1:4000 dilution of anti-ubiquitin-HRP antibody diluted in 3%milk (TBST) for 1 h at room temperature or overnight at 4°C with constant agitation.
3. Wash the membrane 6 times in TBST for 10 min each.
4. Immediately before use, mix 1 ml of chemiluminescent reagent A with 1 ml of chemiluminescent reagent B (sufficient for one 8 x 7 cm membrane).
5. Add chemiluminescent reagent to membrane and incubate with gentle rocking at room temperature for 1-2 minutes prior to visualization of total ubiquitinated species signal using x-ray film or CCD camera imaging.
Method 2: Run a Separate Blot with a Small amount of IP reaction
The signal from the total ubiquitinated species IP will be very strong. It is therefore possible to keep a small volume (5 µl per IP) to run a separate western for the purpose of determining IP efficiency.
Recommended control Reactions
There are several control reactions that are recommended as part of this assay; examples below are for ubiquitination kit (#BK161). See phosphotyrosine (BK#160) and SUMOylation 2/3 (BK#162) manual for detailed control reactions.
A) Ubiquitination IP Control Bead
Ubiquitination IP Control Beads (Cat# CUB02-Beads) are included in the kit and are used to determine the amount of protein-of-interest that may be binding non-specifically to the beads. The Ubiquitination IP Control Beads contained in this kit are sufficient to carry out 10 IP reactions. Instructions for use are given in the assay protocol (STEP 2).
In some cases the unmodified protein of interest will bind non-specifically to Control Beads. It is very rare that ubiquitin modified species bind non-specifically and as ubiquitinated species run at a higher molecular weight than unmodified protein non-specific binding is easily identified. If non-specific binding is of concern then Control Beads can be used to pre-clarify the lysate and this step may improve the specific signal window. Control Beads can be purchased separately in cases where they are needed for pre-clarification of lysates.
B) Total ubiquitinated species
After probing the ubiquitination IP reactions with an antibody to the protein of interest it is recommended to re-probe the blot with an anti-ubiquitin antibody. This control reaction allows the end-user to confirm that the ubiquitination IP reaction has enriched for total ubiquitination species in the lysate. An HRP-conjugated anti-ubiquitin antibody is included in this kit (Cat# AUB01-HRP-S) and instructions for use are given in the Western Blot protocol (STEP 3B).
C) Input
Include a sample of the original pre-IP lysate on the western blot. We recommend 2-5% of IP lysate input. This serves as a marker for the unmodified protein band.
D) Inhibitor Negative Sample
De-ubiquitination by de-ubiquitinases (DUBs) occurs very rapidly in the absence of the DUB inhibitor that is included in this kit (Part # NEM09B). In cases where the ubiquitination signal is very weak or the primary detection antibody gives spurious bands in a western, the inclusion of an IP derived from a lysate that is processed in the absence of inhibitor will often confirm the authenticity of the ubiquitinated species.
Additional Links: